Current Project: 1/3 Girl Body and New Head Pt.1

Tags

, , , , , , , , ,

A mini update on my girl body.

I’ve only made heads up until now, and I decided it was time to make a body. I plan to finish it during the summer, and that goal looks achievable if I continue at the current pace (yay!). I will post more updates soon!

I carved the torso out of floral foam for the torso. Because floral foam is so fragile, I brushed on another type of air dry clay mixed with water so it would create a solid layer once dry. I then wrapped it with clay. I also made the horrible mistake of using thin bamboo skewers for the legs, and it took FOREVER to build up the thickness of the leg.

I carved the torso out of floral foam for the torso. Because floral foam is so fragile, I brushed on another type of air dry clay mixed with water so it would create a solid layer once dry. I then wrapped it with clay. I also made the horrible mistake of using thin bamboo skewers for the legs, and it took FOREVER to build up the thickness of the leg.

DSC_0177

I was planning on sculpting the entire body first before cutting it into pieces, but later realized it might be easier to work on joints and aesthetics simultaneously. It is also because my (horribly DIY’d) sanding box is too small to fit the entire body.

DSC_0308

Dismembered.

DSC_0316

Sanded torso and started the torso joint.

DSC_0318

I wrapped a small Styrofoam ball in clay, then trimmed it so it is a hemisphere. I will be adding this to the thigh for the thigh joint.

DSC_0319

Making sure the joint fits.

DSC_0321

Looks good.

DSC_0323

More sanding.

DSC_0326

Hollowed out the thigh (which took forever, never use bamboo skewers that thin!) and connecting thigh joints.

DSC_0327

Fixed the boobs and added collarbones.

DSC_0328

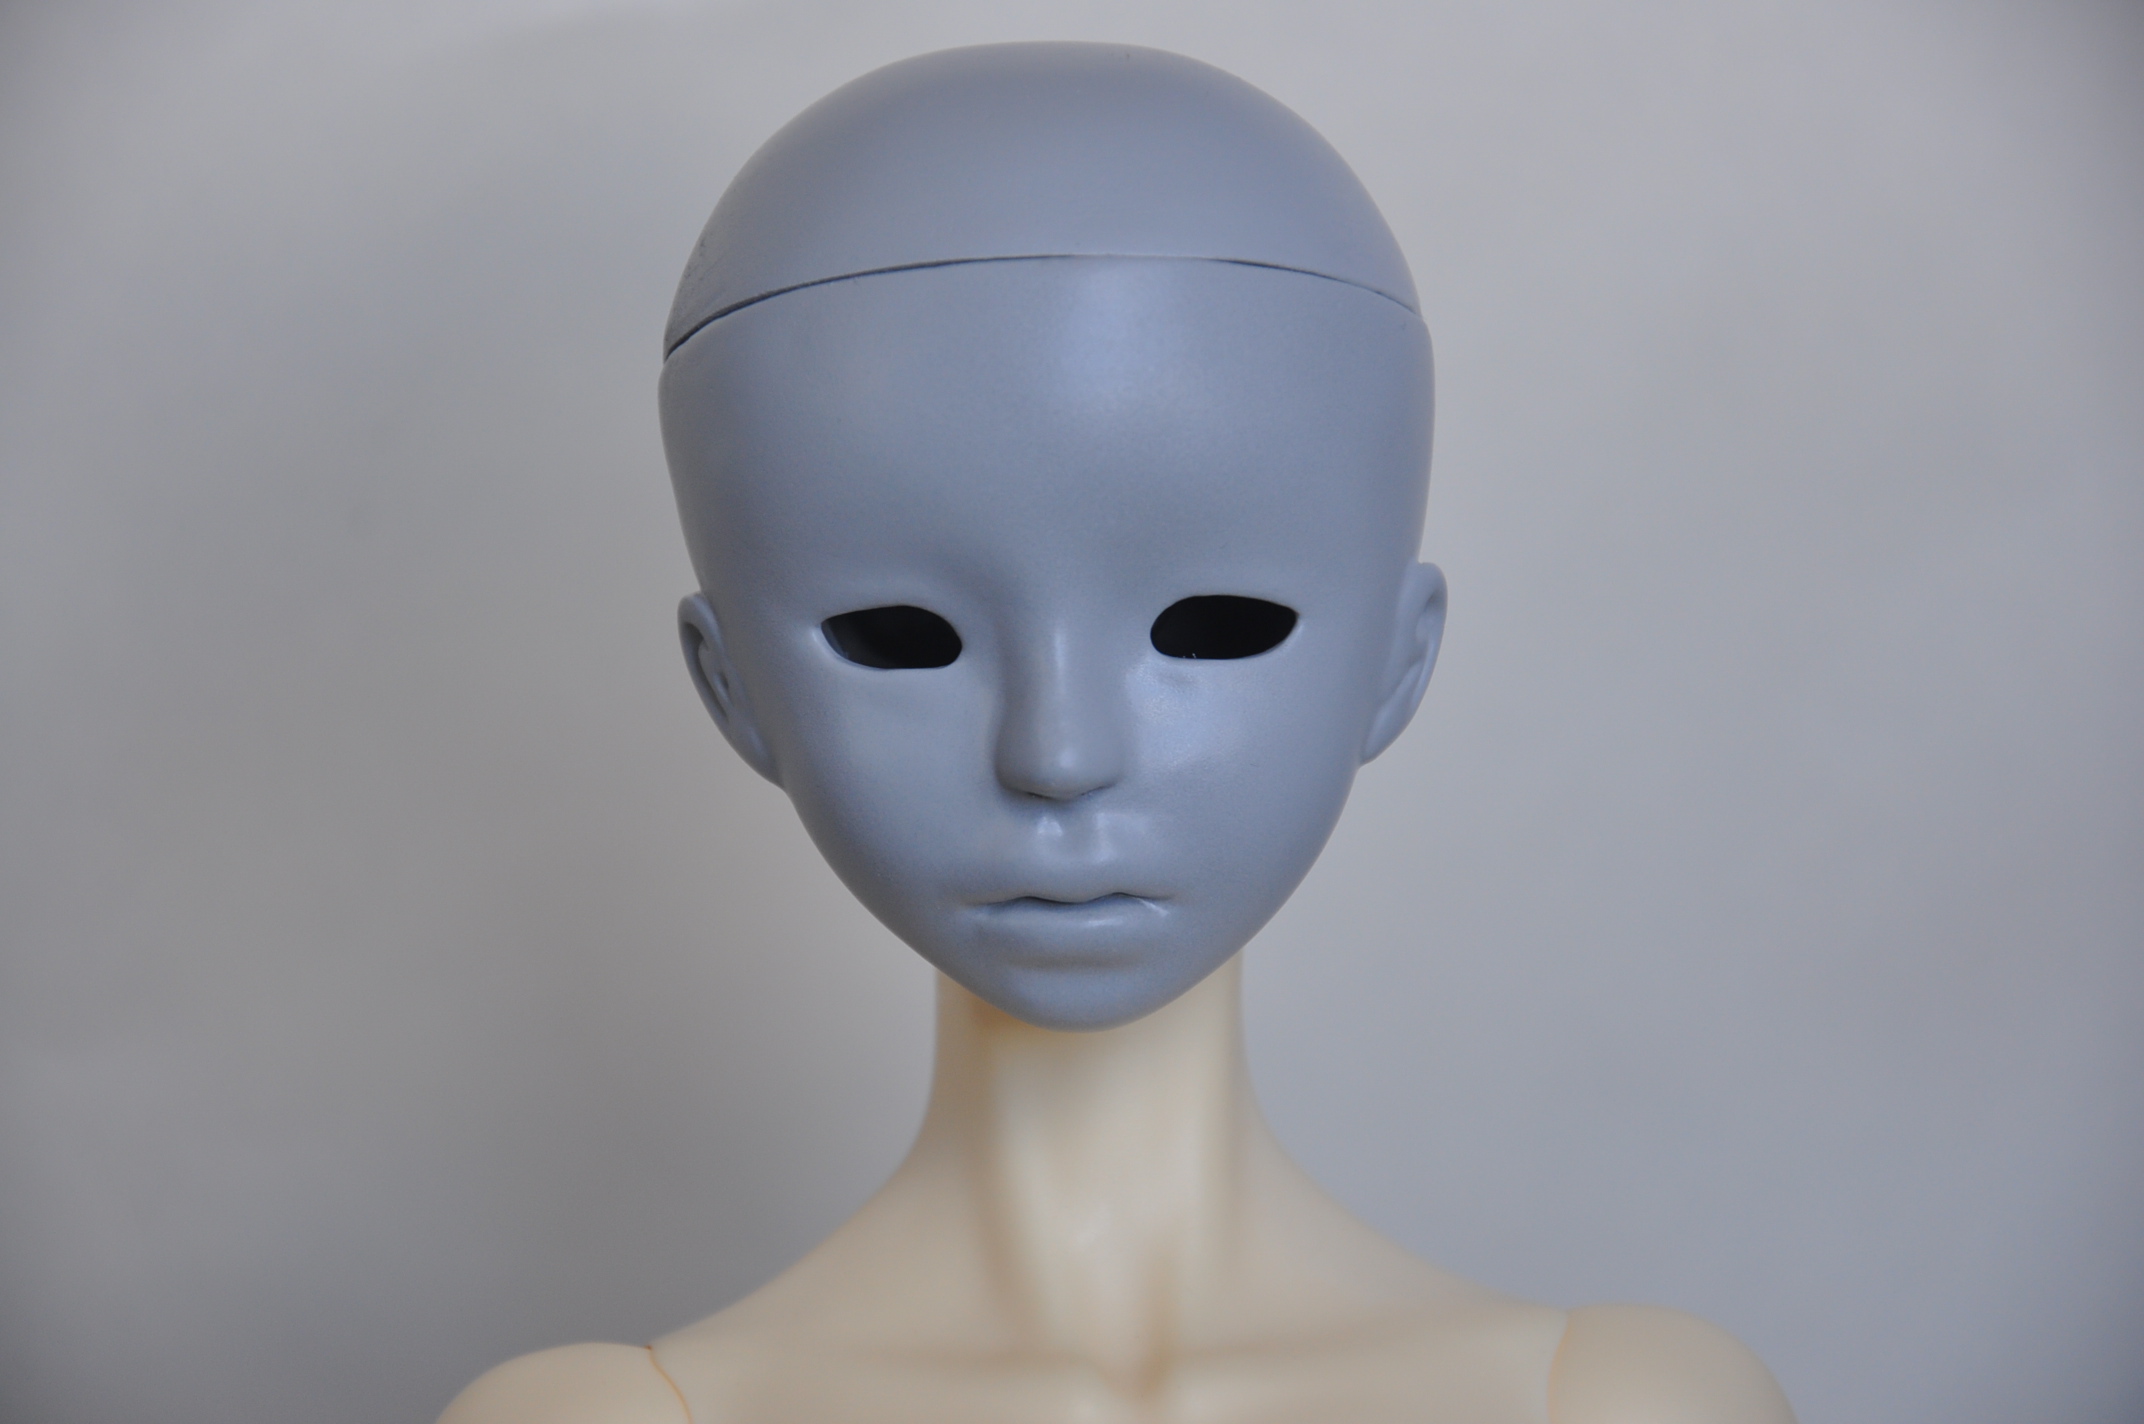
Tried it with the new head, not bad!

DSC_0329

DSC_0330

Carved curves into the thighs to accommodate the joints.

DSC_0331

The shape of the thighs still need some work, but I think it looks pretty good so far! And no, I haven’t made arms yet…

Doll Sculpting Workshop at Doll North

Tags

, , , , , , , , , , ,

I was very honoured to host a doll sculpting workshop at Doll North, Anime North on Sunday, May 24. It was a spontaneous idea at first, and I was very surprised when Sabrina, staff of Doll North, allowed me to do it! The workshop was 3 hours, and we focused on sculpting doll heads. I met so many wonderful people there, and had very insightful chats with other doll makers as well!

Thank you so much Sabrina for giving the opportunity to do this, and thank you to the participants of this event for being so lovely and so supportive! Also a big thanks to Chloe for being my assistant and taking these pictures throughout the workshop!

I did manage to catch a cold on Saturday though, so I was sniffling and having a fever during the workshop. I felt sort of bad because I was so low energy the entire time, it was probably not the most fun to listen to. The participants were very understanding however, so thank you for that!

DSC_0184

We arrived half an hour early to set up, diving the tool and clay for each participant.

DSC_0185

Setting up my table and the video camera. My doll is there for moral support.

DSC_0186

I brought my own tools, just because they’re what I’m used to.

Creating sketches.

Creating sketches.

Creating sketches.

Creating sketches.

Creating sketches.

DSC_0204 DSC_0200

DSC_0214

Kneading the clay.

DSC_0212

Rolling out the clay, and wrapping it around the Styrofoam ball.

DSC_0249

Me working on my head.

DSC_0221

Everyone hard at work!

DSC_0223 DSC_0226 DSC_0251 DSC_0255 DSC_0256

DSC_0258

My head.

DSC_0280

I like this head quite a bit, and plan to keep working on it at home! I’ve already named it May (since this happened in May).

DSC_0263

Corset Patterns the Lazy Way

Tags

, , , , , , , , , ,

Corsets are absolutely gorgeous, but the pattern sketching process is so painful it’s almost not worth it. If you are lazy and hate measurements like me, you will love this method of sketching corsets. Although it is most ideal for corsets, it can also be used to create any type of tight-fitting clothing.

You will need:

  • A doll
  • Saran wrap
  • Tape
  • Pencil
  • Scissors
  • Paper

Step 1.

Pick a doll to make the corset for. Since this will be form-fitting, it will need to be the exact doll that you will put the garment on.

I am using a Fairyland Minifee body here.

Step 1

Step 2.

Wrap the body in saran wrap.

DSC_0121

Step 3.

Wrap the body in tape. Scotch tape is idea (what I’m using here), but other types of tape will work as well. Cover a slightly larger area than where the clothing will be covering. Try to follow the curvature of the body, using smaller pieces of tape where the curves are more defined. Also make sure to tape in different directions so the whole thing would not fall apart when it is removed from the doll.

DSC_0123 DSC_0125 DSC_0128 DSC_0130

Step 4.

Sketch your corset on the tape. Start with the outline, then make out the center front line and the center back line. Next, mark divisions on the breast area. You would need to make cut lines where ever there are defined curves (i.e. chest and waist).

DSC_0131 DSC_0132 DSC_0133 DSC_0134 DSC_0135 DSC_0136 DSC_0137

Step 5.

Cut along the center back seam to remove the tape structure from the doll. Then, cut along the outline of the corset. Try it on the doll to check how it looks, and when satisfied, cut along the center front seam to split the corset in half. Take the better looking half and separate that into more pieces by following the lines drawn previously. It is a good idea to number the pieces in order since they tend to look quite similar when cut into smaller pieces.

DSC_0138 DSC_0139 DSC_0140 DSC_0142 DSC_0143 DSC_0144 DSC_0145 DSC_0148

Step 6.

Trace the tape pieces onto paper, or whatever you prefer to create patterns on. I am using cue cards here because I like the stiffness of them. Add seam allowance. I chose to trace it once, but you can also flip the pieces over and trace again to get the other half of the corset so you do not have to flip the pattern when cutting the fabric later on, but this is completely up to you.

DSC_0149 DSC_0153

And that’s it! Super easy and fast compared to the traditional way with measurements and math(ew)!

Not only is this great for corsets, but I have also used this method for bras, bodice part of dresses, and even shorts!

Here are some examples of clothing made with this method. I hope you will give this a try, and please share pictures of your work, I would love to see it!

DSC_03732 DSC_04382 DSC_04072

Current Project: 27cm Doll Through 3D Printing

Tags

, , , , , , , , , , , ,

My two other heads haven’t even been casted, and I already cannot wait to start another project! I wanted to make a complete doll this time instead of only making heads. However, seeing how long sculpting a head takes, making a body seemed like an overwhelmingly big task. I thought I would save myself some time and experiment with 3D printing.

I first started by making a sketch of my design, and scanned it into the computer and fixed it a bit with Photoshop. I also straightened out an arm because it is easier to work work with things that are vertically up and down, on the z-axis, rather than something diagonal. It is on lined paper and sideways because I did not expect it to be the official version. It was created  one day when I was bored and doodling, and I ended up liking it quite a bit, so I just went with it!

26-03-2015 2;32;05 PM1

Next, I started making the rough shapes following the sketch using Blender.

Screenshot (11)Screenshot (12)Screenshot (16)Screenshot (21)

The body is now almost exactly the same as the sketch.

Screenshot (26)

I then worked on making the body look more realistic, without following my sketches. I took screen shots of each modification and put them side by side in the same picture to compare them in more detail. After many attempts, I finally had a model that I was happy with.

Screenshot (29)2

Next, I started working on the head. I was originally planning on only making the body through 3D printing, and making the head using clay. However, seeing how efficient 3D modeling is, I don’t think I can ever go back to clay sculpting!

I first made the general shape of the head in Blender, then exported to Sculptris to sculpt the face in more detail.

Screenshot (44)

Screenshot (47) Screenshot (49) Screenshot (53)

Next, I exported the head back into Blender, and created the hands and feet. After seeing the complete doll together, I realized the arms were too skinny, and several adjustments needed to be made.

Screenshot (58)Screenshot (57)

When I was finally satisfied with the overall look of the doll, I added thickness to the faces of the model by either using the “solidify” modifier or manually extruding the edges. I separated the knee joints and elbow joints, and created the peanut joints inbetween.

Screenshot (60) Screenshot (62) Screenshot (63)

I am very happy with the results. The model is nowhere near perfect, and many parts I just left rough. This is because I expect to do a lot of sanding after the doll is printed even with a perfect model, so I do not think it is worth the time to make the model smooth and flawless. I can always fix details with some ladoll clay or epoxy putty. It is also because I learned Blender and 3D modeling myself and am not skilled enough to do it. Furthermore, I have lots of work to do on the joints as well, since I could only guess the approximate joint mechanisms. I would also have to drill many holes to put the doll together.

All in all, I am very impressed with the efficiency, as well as the amount of detail 3D modeling can achieve. I am now getting ready to print this model, and I will get back with the results soon!

Heads Completed! Meet Rosaline and Bluebell!

Tags

, , , , , , ,

I’m super happy to say that the two heads that I’ve been working on for more than a year has finally been completed! I never thought this day would come, because with my perfectionism and OCD, I always have a little something that I want to fix. I’ve spent the last few months just fixing little details, and eventually realized that it will never be perfect. After looking at dolls sold by big doll companies and learning that they are not perfectly smooth and symmetrical, I’ve finally been able to be happy with my project and call it complete!

I have already contacted a castor to get them casted, and I’m sooooooooo excited to see them casted! I really want to be able to put a faceup on them, because dolls usually look quite different before and after a faceup.

Here are some pictures! I’ve named the OE head Bluebell and the SP head Rosaline, after flowers!

Rosaline:

DSC_0338 DSC_0328 DSC_0330

Bluebell:

DSC_0346 DSC_0347 DSC_0360 DSC_0362DSC_0314

Current Project: Two Heads

Tags

, , , , , , ,

Hey guys! I wanted to share my current project with you, so here they are – two 1/3 sized BJD heads!

I have spent a few months on them, working for a few hours every week. They are really close to being done, I just have to finish sanding, and finish making the neck joint and eye holes! They are actually the second and third heads that I made. Since I have zero experience in sculpting, my first head was a tester head and it doesn’t look all that good, so I’m not gonna show.

I am planning on casting these two heads once I am done, but will probably go to a professional castor since this is my first time getting anything casted. I’ll probably try casting myself for a future project.

So this is what they look like right now…

DSC_0231 DSC_0229  DSC_0232 DSC_0228DSC_0233 DSC_0234

As you can see, I still have quite a lot of work left to do. It will take a long time for me to fill in the holes on the face, and sand it completely flat. I also need to work on the head caps. I haven’t sprayed them with primer because I wanted to sand it down a bit, since it’s too big on the head right now. I also need to make room for the magnets.

I’m having lots of trouble sanding the eye wells because it is difficult to make the thickness even throughout. I also find it hard to sand the ears as I can’t get into the little grooves with my sand paper.

I have some pictures I took while I was making these heads. I didn’t anticipate on posting these online, so they are all crappy phone/iPad photos. However, it’s still cool to see how they’ve transformed in a few months!

1

2 3 5 6 7 8 9 10 11 12 13

14 15 16 17 18 19 20